Why do you need to seam seal some Silnylon shelters?
Silicone Nylon or its common name "silnylon" fabric has the benefits of being very light, very waterproof and because its fibres are infused in a coating of silicone, this fabric is both stronger and lighter than traditional tent fabrics.
Since silicone is inert, it has the added benefit that it will never mould or mildew. The tight bond between the coating and fabric yarn insures that unlike traditional polyurethane coated fabrics, it will never delaminate.
The downside is that seam tapes designed to work on polyurethane coated fabrics will not stick to silicone nylon. This requires that you hand seal the seams. In order to seam seal silicone nylon, you need a silicone based sealer.
The silicone in the sealer will form a permanent bond with the silicone in the fabric. Once seam sealed, your tent will last for years. For Silicone Fabrics, we recommend using McNett's SilNetTM.
Sealing Your Shelter
Setup and Inspect your Shelter - Setup your tent before sealing it. Get inside and lay down to make sure it fits your needs. Make a through inspection to insure it's properly sewn and all the seams are in good condition. Make sure you are happy with the shelter before proceeding. Once the tent is seam sealed you won't be able to return it for a refund.
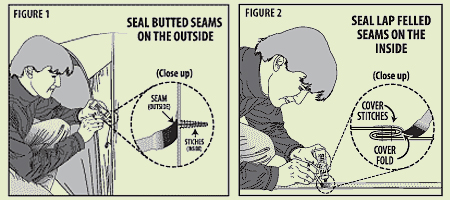
Seal the Seams - Most of seams on these shelters are designed using butt seams (See below). These seams keep the the threads on the inside where they are less exposed to dirt and grim. Butt seams must be sealed from the outside of the canopy. Applying sealer to the underside of the seam will not seal them. Work in a well ventilated area, pour a small amount into a paper cup, and close the jar to keep rest of sealer from thickening. For a neat finish tape off the areas you want to seal with decorators tape. Use a small brush to apply a thin coat of sealer to all exterior seams. For butt seams, hold them open to allow the sealer to soak into the seam and coat the threads. If sealer thickens while applying, add some more white spirit.
Stripe the Floor - For shelters with floors, adding a series of strips sealer to the floor of the tent will reduce the tendency of your sleeping pad to slide around on the silicone nylon floor. (Optional - we suggest using non-slip bowl matting from the Supermarket, quicker, cheaper and less messy)
Drying your Shelter - Allow your shelter to cure for at least 8 to 12 hours after sealing, then remove decorators tape. Once cured, the sealer dries to a clear matte finish that is nearly invisible, and will be both durable and flexible. You may find your seams to feel tacky. This will dissipate with shelter usage. You prefer, it can be eliminated by sprinkling on a light coat of unscented talcum powder.